Table of Contents
Forget the flimsy, store-bought kits; this year, we're taking Easter egg decorating to a whole new level. If you're an adult who secretly loves crafting (or not so secretly), then you've come to the right place. We're not talking about basic dye jobs and sticker mishaps. This is about unleashing your inner artist and creating Easter eggs that are genuinely impressive. This article is your guide to sophisticated techniques, from mastering intricate dyeing methods to exploring unusual materials. We'll show you how to make eggs that are more like miniature works of art than something a toddler would create. Get ready to move past the usual, boring approach, and embrace the refined world of easter egg decorating for adults. We'll cover everything from elegant watercolor washes to adding delicate gold leaf, ensuring your Easter basket is the envy of all. So, grab your eggs, gather your supplies, and let's get started on this grown-up Easter adventure!
Sophisticated Dyeing Techniques for Easter Eggs
Sophisticated Dyeing Techniques for Easter Eggs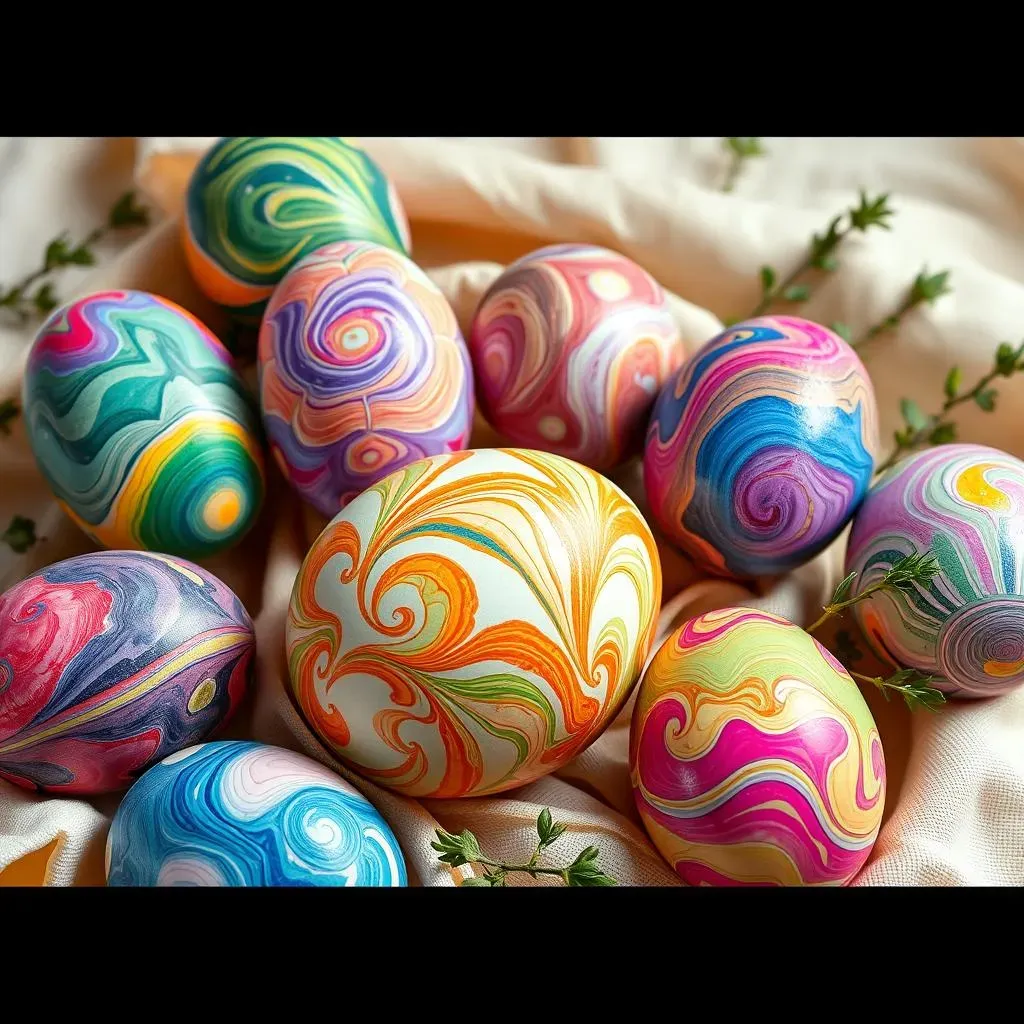
Getting Started with Natural Dyes
so you’re tired of those neon-colored dye tablets that come in the box, right? I get it. Let's talk about natural dyes, it is like going back to the old ways, but with a modern twist. Think vibrant hues from things you might already have in your kitchen. We're talking turmeric for that sunny yellow, beet juice for a deep, moody pink, and red cabbage for a surprising blue. The process is pretty simple, just simmer your chosen dye stuff with some water and a splash of vinegar, then let your eggs soak. It's like a little science experiment that ends with beautiful, unique eggs. Plus, it's way more eco-friendly than those artificial colors.
Now, here’s a little secret: the longer you let your eggs soak in the dye, the more intense the color will be. Want a light pastel shade? Just a quick dip will do. Craving a deep, rich tone? Let those eggs hang out in the dye bath for a few hours, or even overnight in the fridge. It’s all about experimenting and seeing what happens. Don’t be afraid to mix different dyes to create custom colors. I once mixed beet juice with a little turmeric and got a fantastic coral hue – total accident, but it was amazing. So, get creative, have fun, and embrace the unpredictable nature of natural dyes.
Natural Dye Source | Resulting Color | Tips |
|---|---|---|
Turmeric | Yellow | Use fresh or powdered; simmer for best results. |
Beet Juice | Pink to Red | Use fresh juice; longer soak for deeper colors. |
Red Cabbage | Blue to Purple | Chop cabbage, simmer, and strain. |
Exploring Marbling and Tie-Dye Effects
Alright, now that we've covered natural dyes, let’s talk about making things a bit more swirly and interesting. Marbling is where it’s at if you want eggs that look like they belong in a fancy art gallery, not just a basket. You can achieve this with shaving cream, which sounds weird, I know, but trust me. Spread some shaving cream in a dish, drop in a few drops of different food coloring, swirl it around with a toothpick, and then roll your egg through it. The result? A totally unique, marbled effect. It’s messy, it’s fun, and it’s seriously addictive.
And if you’re feeling extra crafty, let's talk about tie-dye! It's not just for t-shirts anymore. You can get that groovy tie-dye effect on your eggs using rubber bands or string to section off areas before dyeing. Think of it like a little egg-sized canvas. After you've tied up your egg, dip it into different colors, and then remove the ties to reveal the awesome pattern. Each egg will be a one-of-a-kind masterpiece. It's surprisingly easy, but the results are seriously impressive. You'll probably spend way too long just staring at your cool eggs.
“The best way to learn is by doing. Don't be afraid to experiment with different techniques and materials. You might just discover your new favorite Easter egg design.” - A random crafter.
Intricate Painting and Drawing on Easter Eggs
Intricate Painting and Drawing on Easter Eggs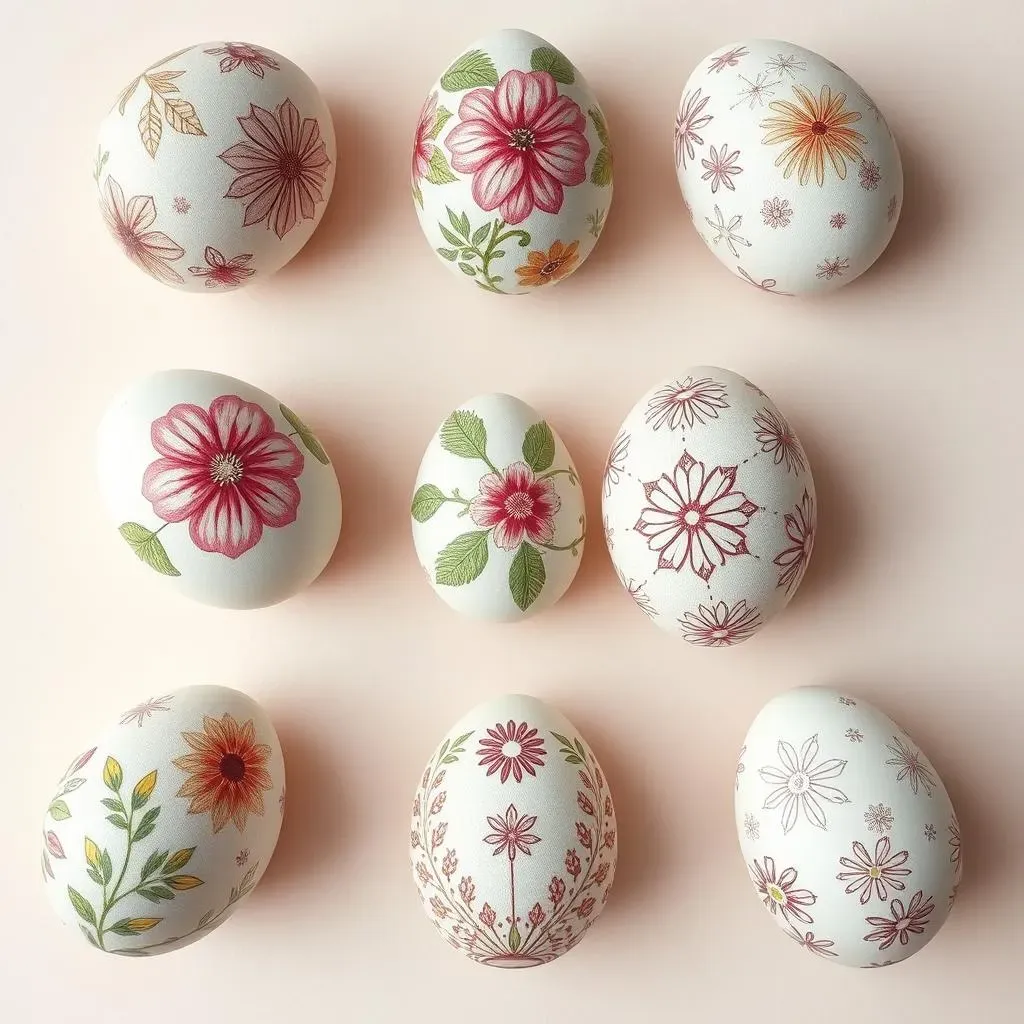
Getting Started with Fine-Tipped Tools
so you've got your dyed eggs, now it's time to get detailed. We're moving beyond basic paintbrushes and into the realm of fine-tipped tools. Think tiny brushes, paint pens, and even toothpicks. I know, toothpicks sound a bit strange, but they are fantastic for adding tiny dots or creating intricate patterns. The key here is to take your time and work in layers. Start with a light base coat, then gradually add your details. It's like building a tiny masterpiece, one stroke at a time. Don't rush it; this is where patience really pays off.
One thing I've learned is that having a good selection of tools makes a world of difference. Invest in a few different sizes of fine-tipped brushes and a set of paint pens with various nibs. This will give you the flexibility to create all sorts of designs, from delicate floral patterns to geometric shapes. And don't forget about stencils! They're a great way to achieve clean, crisp lines, especially if you're not feeling super confident in your freehand drawing skills. It's all about finding what works best for you and your artistic style.
Tool | Best Use | Tips |
|---|---|---|
Fine-tipped brushes | Detailed lines and patterns | Use a light touch, clean brushes often. |
Paint pens | Bold lines and lettering | Shake well before use, store pens properly. |
Toothpicks | Tiny dots and textures | Use the pointed end for dots, the flat end for lines. |
Exploring Different Painting Techniques
Now that you've got your tools sorted, let's dive into different painting techniques. Watercolor washes are a beautiful way to create soft, dreamy backgrounds on your eggs. You can achieve this by diluting your paints with water and applying them in thin layers. The result is a gentle, translucent effect that's perfect for showcasing other details. Another great technique is pointillism, which involves creating an image using only dots. It's a bit time-consuming, but the effect is stunning. I've found that using different colors and sizes of dots can add a lot of depth and texture.
And if you're feeling adventurous, why not try some metallic paints? Gold, silver, and copper can add a touch of elegance and sophistication to your Easter eggs. You can use them to create intricate patterns or to highlight certain areas of your design. I once painted a mandala design on an egg using gold paint, and it looked like something out of a museum. The key here is to experiment and have fun with it. Don't be afraid to try new things and push your creative boundaries. That's where the real magic happens.
"Art is not what you see, but what you make others see." - Edgar Degas
Adding Details and Finishing Touches
So, you’ve got your base coats, your patterns, and your techniques down, now it's time for the little details that will really make your eggs shine. Think about adding tiny embellishments like glitter, rhinestones, or even tiny pieces of paper. A bit of sparkle can go a long way in adding a touch of glamour to your designs. You can also use a fine-tipped brush to add delicate details like tiny dots, lines, or swirls to enhance your painted designs. Remember, it's these small touches that can really elevate your eggs from cute to truly spectacular.
Finally, don't forget about the finishing touches. Once your paint is completely dry, consider applying a coat of sealant or varnish to protect your designs and add a subtle sheen. This will help your eggs last longer and make them look even more polished. I've found that a matte sealant works great for a more natural look, while a glossy varnish adds a touch of elegance. It's all about finding what best suits your artistic vision. So, there you have it: a complete guide to intricate painting and drawing on Easter eggs. Now go forth and create something amazing!
Unique Material Embellishments for Adult Easter Egg Decorating
Unique Material Embellishments for Adult Easter Egg Decorating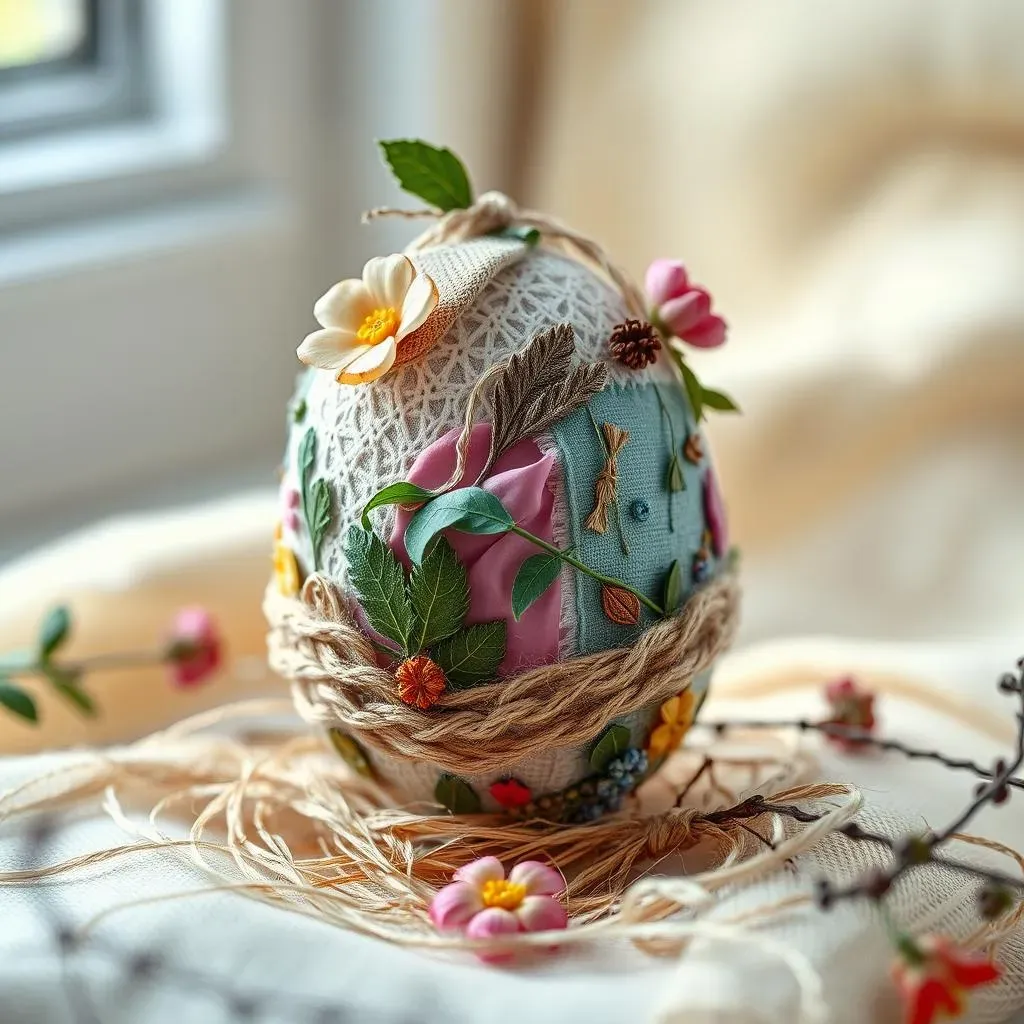
Adding Texture with Fabric and Lace
so you've dyed and painted your eggs, now let's get tactile! We're talking about adding some serious texture with fabric and lace. Think beyond just paint; let's bring in some actual materials. I’m not kidding, this is where things get really interesting. Imagine wrapping your eggs in delicate lace, creating intricate patterns that are both beautiful and a little bit unexpected. You can use Mod Podge or a similar adhesive to adhere the fabric to the egg, carefully smoothing it out as you go. It's like giving your egg a fancy little outfit.
And don't stop at lace! Think about using scraps of silk, burlap, or even old denim. The possibilities are endless! Each fabric will bring a different feel and look to your egg. For instance, burlap will give you a rustic, natural vibe, while silk will make your eggs look elegant and refined. It’s all about playing with different textures and seeing what you can create. And a pro tip: try using different colors of thread to add even more detail around the edges of the fabric. It's a small touch, but it makes a big impact.
Material | Texture | Look |
|---|---|---|
Lace | Delicate, openwork | Elegant, intricate |
Silk | Smooth, soft | Luxurious, refined |
Burlap | Rough, textured | Rustic, natural |
Using Natural Elements: Twine, Leaves, and More
Now, let's bring the outdoors in! Why not use natural elements to add some earthy charm to your Easter eggs? Think about wrapping your eggs in twine or string, creating a rustic look that is both simple and stylish. You can use different colors and thicknesses of twine to create different patterns and textures. I've found that using a bit of glue helps to keep the twine in place, but don't overdo it – you want the natural texture to shine through.
And if twine isn’t your thing, you can also use leaves, flowers, or even small twigs to embellish your eggs. You can press dried leaves onto your eggs using Mod Podge for a natural, botanical feel. Or, you can use tiny flowers to create a delicate, whimsical design. I once used some dried lavender to decorate an egg, and it not only looked beautiful but also smelled amazing! The key here is to be creative and experiment with different natural materials. It’s amazing how much beauty you can find just outside your door.
“Nature always wears the colors of the spirit.” – Ralph Waldo Emerson
Adding Metal and Metallic Accents
Alright, let's add some shine to these eggs! We've talked about fabric and nature, now it's time for some metal and metallic touches. Think about using gold leaf to add a touch of luxury to your eggs. It sounds fancy, but it's actually pretty easy to do. Just apply a thin layer of adhesive, carefully place the gold leaf, and then gently brush away any excess. The result is a stunning, gilded effect that’s sure to impress. And if gold leaf is too much, you can always use metallic paint or pens to add accents and details. A few strokes of silver or copper can really elevate your design.
And don't just limit yourself to gold, silver, and copper, think about using small metal charms, beads, or even wire to add some dimension and interest to your eggs. You can glue tiny metal charms onto your eggs, creating a unique, personalized design. Or, you can use wire to create intricate patterns or to wrap around your eggs, adding a sculptural element. I once used some antique-looking metal beads to decorate an egg, and it looked like a little treasure. The key here is to have fun with it and don't be afraid to mix and match different materials. It’s all about making your eggs as unique as you are.
Advanced Easter Egg Decorating: Beyond the Basics
Advanced Easter Egg Decorating: Beyond the Basics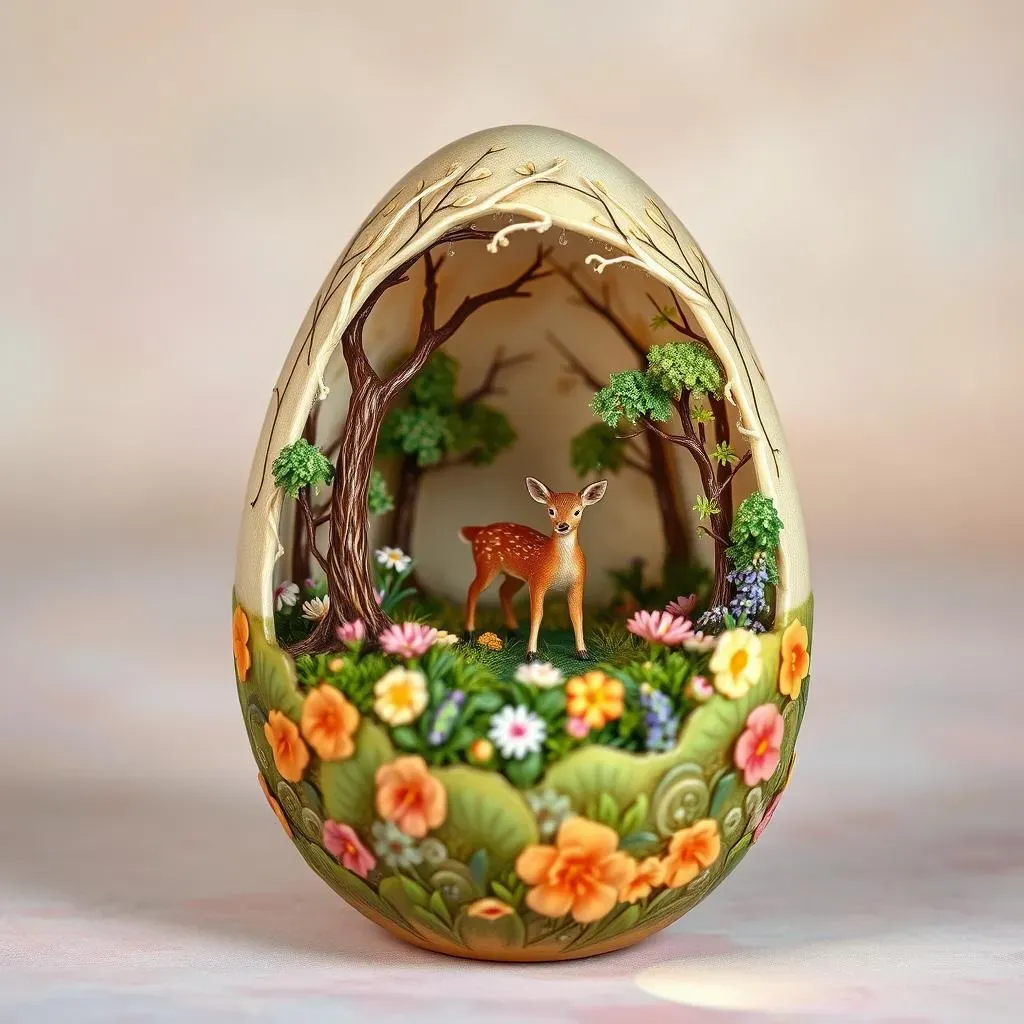
Creating Dioramas and Miniature Scenes
so you've mastered the basics, now let's get seriously creative! We're talking about turning your Easter eggs into tiny worlds, like mini dioramas. Think about cutting out a small opening in your egg and creating a little scene inside. You can use tiny figurines, bits of moss, or even small pieces of paper to build a miniature landscape. It’s like having a tiny snow globe, but way cooler and more Easter-y. I once created a tiny forest scene inside an egg, complete with a miniature deer and some fake snow, it looked amazing. It's a bit fiddly, I'll admit, but the result is so worth the effort.
And if dioramas aren't your thing, how about creating a miniature scene on the outside of your egg? You can use modeling clay, tiny beads, or even bits of wire to create a 3D design. Think about a tiny garden, a miniature cityscape, or even a tiny abstract sculpture. It’s like turning your egg into a tiny piece of art. You can even paint the background of your egg to create a backdrop for your scene. It's all about pushing the boundaries and seeing what you can create. I've found that the more creative you get, the more impressive your eggs will become.
Technique | Description | Materials |
|---|---|---|
Diorama | Creating a scene inside the egg | Mini figurines, moss, paper |
3D design | Creating a scene on the egg's surface | Modeling clay, beads, wire |
Background painting | Adding a backdrop to the egg | Acrylic paints, fine brushes |
Incorporating Mixed Media and Collage
Now, let's talk about mixing things up. Forget sticking to just one medium; let's explore the world of mixed media and collage. This is where you can really let your creativity run wild. Think about combining paint, paper, fabric, and even found objects to create a truly unique design. You can use Mod Podge to adhere different materials to your egg, creating layers of texture and visual interest. I once created a collage egg using bits of old magazines, maps, and even some dried flowers, it looked like a tiny treasure chest. It's all about experimenting and seeing what happens when you combine different materials.
And don't be afraid to think outside the box. Think about using unconventional materials like buttons, sequins, or even small pieces of metal. You can use glue or wire to attach these materials to your egg, creating a design that is both beautiful and unexpected. You can also use different types of paper, like tissue paper or washi tape, to add pops of color and pattern. I've found that the more diverse your materials, the more interesting your egg will become. It's all about pushing the limits and seeing what you can create. And remember, there are no rules when it comes to mixed media, just have fun and enjoy the process.
"Creativity is intelligence having fun." - Albert Einstein
Working with Resin and Epoxy
Alright, if you’re ready to take your egg decorating to the next level, let's talk about resin and epoxy. This is where things get a bit more technical, but the results are seriously impressive. Resin is a clear, glossy material that you can use to encase your eggs, creating a smooth, glass-like finish. You can embed small objects, glitter, or even dried flowers in the resin, creating a unique, 3D effect. It’s like creating a tiny paperweight, but way more stylish. I once created a resin egg with some tiny seashells and sand, it looked like a little piece of the ocean.
And if resin seems a bit too intimidating, you can always try using epoxy. Epoxy is similar to resin, but it’s often a bit easier to work with. You can use it to create a smooth, glossy finish on your eggs, or you can use it to adhere different materials, like beads or metal accents. I've found that using a small brush or toothpick helps to apply the epoxy evenly, and remember, it takes time to dry, so you have to be patient. The key here is to practice and experiment. Once you get the hang of it, you’ll be creating eggs that look like they belong in a museum. It's all about pushing the boundaries and seeing what you can create with these advanced techniques. And remember, safety first, always wear gloves and work in a well-ventilated area when working with resin and epoxy.
Wrapping Up Your Adult Easter Egg Masterpieces
So, we've journeyed from simple dyeing techniques to the heights of artistic expression, proving that easter egg decorating for adults can be anything but childish. You've now got a arsenal of ideas, from elegant paint strokes to fancy embellishments, ready to transform ordinary eggs into conversation pieces. The key takeaway here? Don't be afraid to experiment, get messy, and push your creative boundaries. Whether you choose intricate patterns, bold colors, or unexpected materials, your decorated eggs will reflect your personal style and the time you invested. This isn't just about pretty eggs; it's about embracing the creative process and adding a touch of sophistication to your Easter celebrations. Now, go forth and create some egg-cellent art!